


What does BitLocker do on your Windows PC and how do you enable it?
- August 2, 2024
- 0
BitLocker adds an extra layer of security to Windows, but many users don’t even know if it’s enabled on their device. How do you enable BitLocker and why


9621 Agnes Crossing, Lake Suzanneview, New Mexico Island 84604-9295.
BitLocker adds an extra layer of security to Windows, but many users don’t even know if it’s enabled on their device. How do you enable BitLocker and why


BitLocker adds an extra layer of security to Windows, but many users don’t even know if it’s enabled on their device. How do you enable BitLocker and why should you?
Microsoft added BitLocker to Windows in 2007, which means the security feature has been around since Windows Vista. You might think that the feature would be well known among Windows users by now, but ask ten random PC owners what BitLocker is for, and most of them might not be able to give you an answer.
BitLocker is a feature that you as a user have to enable yourself if you don’t have a new Windows PC running Windows 11 23H2 or later. In future versions of Windows, Microsoft wants to do this automatically for you, but for now you still have to do it manually. We’ll show you how to do this and why you should enable BitLocker in the first place.
BitLocker is an encryption tool for encrypting your PC’s internal hard drive and can also be extended to external drives. This protects local files on your PC in case the device is lost or stolen. BitLocker converts files into unreadable code that an unlawful owner can only decrypt with a unique key.
BitLocker can also work without Trusted platform module (TPM), but benefits from the presence of a security chip. With a TPM, the encryption key is stored in your device’s hardware. A TPM 2.0 chip is one of the requirements for running Windows 11. It’s likely that your PC is still running Windows 10, but there’s no guarantee that a TPM module is built into the internals.
Not every version of Windows is equipped with BitLocker. Microsoft reserves the feature for the Pro, Enterprise and Education versions of Windows 11 and Windows 10. The Home version for private users contains a similar feature called Device Encryption. The difference is that BitLocker uses a stronger encryption protocol (XTS-AES 128/256-bit) and offers the user more options to encrypt the entire hard drive or some parts.
BitLocker is not (yet) automatically activated on all Windows PCs. However, the function is easy to find via the settings, but you have to know where to look.
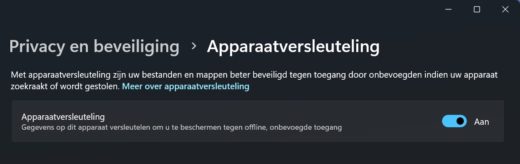
First, we’ll show you how to enable device encryption, which is available for every Windows PC. It’s just a matter of checking a simple on/off button. In Settings, go to Privacy & Security and then Device encryption. Use the slider to activate the encryption function.
You should look for BitLocker below system > Storage > Advanced storage settings > Disks and volumes. Here you will find an overview of the available drives and storage volumes on your device. click on Characteristics to see more information. We demonstrate this Local Disc (C:): the internal hard drive of our PC.
With BitLocker you can encrypt the entire drive to protect all the files on your device. Under the front box BitLocker You can see if this is enabled for the drive, if not you can enable it here.
A slightly more complex method to enable BitLocker is to use Powershell. Start the command with Enable BitLocker. Then specify the storage volume you want to encrypt. For example, enter (C:): If you want to entrust your internal hard drive to BitLocker, as in the previous step. Finally, Powershell will also ask you to specify how you want to secure the BitLocker key. This can be done using TPM, a PIN code, a startup key, or a combination of several methods.
This example from Microsoft shows what a PowerShell script for BitLocker would look like if you were to use the TPM chip in combination with a boot key.
Enable BitLocker
[-MountPoint]
-TpmAndStartupKeyProtector
[-StartupKeyPath] [-EncryptionMethod ]
[-HardwareEncryption][-SkipHardwareTest]
[-UsedSpaceOnly]
[-WhatIf]
[-Confirm]
[]
If BitLocker is running, you may see a recovery screen when you start your PC. This can happen, among other things, if you make (too many) failed login attempts, if you try to change BIOS settings or security firmware, and in exceptional cases, if Windows behaves strangely after an update.
In these rare cases, it’s important that you have your BitLocker key handy, otherwise you’ll be left with an unusable device. Here’s how to find it.
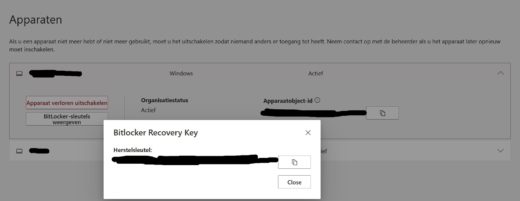
You can find your device’s BitLocker key through your online Microsoft account. Sign in and go to the menu Devices. Expand the window and click View BitLocker keys. You will now see your key ID, but you will need to click again to get the effective recovery key. The recovery key is a 48-digit number sequence. Keep your key in a safe place.
For work accounts, the BitLocker key can also be viewed in Azure Active Directory. If you don’t have access to your organization’s Azure AD through your account, you’ll need to ask your administrator for help to get your key.
You may have read in a news article that BitLocker has been cracked. This is far from easy and requires a lot of technical knowledge and special equipment, but it is never impossible. Always play it safe and make backups of your files before encrypting them: a piece of advice that counts in any situation, with or without BitLocker.
Source: IT Daily

As an experienced journalist and author, Mary has been reporting on the latest news and trends for over 5 years. With a passion for uncovering the stories behind the headlines, Mary has earned a reputation as a trusted voice in the world of journalism. Her writing style is insightful, engaging and thought-provoking, as she takes a deep dive into the most pressing issues of our time.


