Create your own glossaries using GPT-3 tags and Google Sheets
March 8, 2023
0
Although now everyone is talking about ChatGPT and Prometheus, both development versions of OpenAI (the latter jointly with Microsoft) it owes a lot to GPT-3, a generative AI
Although now everyone is talking about ChatGPT and Prometheus, both development versions of OpenAI (the latter jointly with Microsoft) it owes a lot to GPT-3, a generative AI model capable of producing texts of all kinds and in virtually any style. With a more professional focus (unlike ChatGPT, GPT-3 is not free), in this case we are not talking about a chatbot, but rather a tool that is supposed to offer a service similar to hiring the services of a professional writer. The price is cheaper, but of course the result doesn’t offer the same level of workmanship and quality that the writer provides (and I’m not just speaking for myself).
Well, first of all, it’s clear what is explained in this tutorial is not free… although it is quite likely that it will not cost you money. This is because OpenAI gives all accounts a balance of $18 to use in their wide catalog of AI-based services. And no, in case you’re wondering, using ChatGPT doesn’t affect the said balance because it’s a free service unless you sign up for its Plus mode, in which case you’ll have to pay a monthly fee that won’t even come out of the said balance .balance.
So if you have an OpenAI user account (which is the same for ChatGPT as for other services) and a Google account to use Google Sheets (Google Sheets), you can use them in combination with the attachment for the same ones that integrate GPT-3 features directly into your tables. If you still don’t have an OpenAI user account (I assume Google does), here’s how to sign up.
A personalized glossary?
You might be wondering what exactly I mean, what are we going to create in this tutorial. For example, imagine that you are considering the first steps in World of Warcraft (or any other game, this is just an example). To help you, you would like to have a small dictionary that collects the most common expressions in the game, but searching the Internet does not offer you such a thing, and of course, since these are your first steps, you still do not have the necessary information to create them yourself. Another example, let’s say that for whatever reason you need a list of the most common diseases along with a simple description of them. You can spend hours creating this list, but you can also let GPT-3 and Google Sheets do it for you in seconds.
However, it is very important to be clear that if ChatGPT ever responds incorrectly, this problem can also occur with GPT-3, so it is always recommended that once the initial text is generated process to make sure it is correct. You should never expect the output of text generative AIs to be final, you should consider it a rough draft that will still need some work. But much less than if you had to do it all from scratch.
So there are many reasons that may lead you to need or want a personalized glossary, whether it’s medical terms, car brands, pirate jargon… the possibilities are endless, and if you haven’t, sure enough, soon you can think of an interesting use for this function.
Remember, yes, as we have already indicated in this tutorial We assume you already have a Google and OpenAI user account.
Connect GPT-3 with Google Sheets
The first thing you’ll need to do is open a new workbook in Google Sheets, which you can do by clicking on this link and on the page that opens, click on the “Blank” design shown in the list above, on the left. This way you will be in front of a blank page in a few seconds.
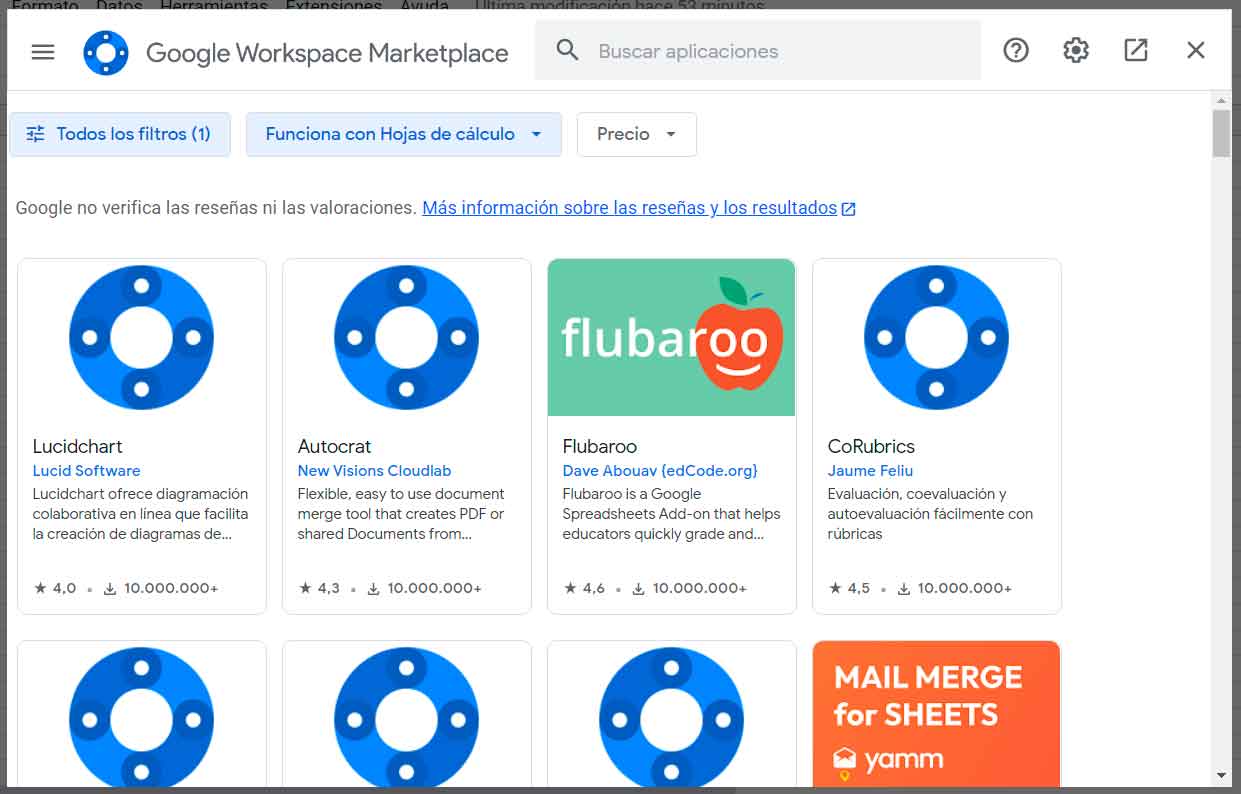
Then click Extensions, then Add-ons, and finally Download Add-ons from the top menu, which will bring up the Google Workspace marketplace (extension store).
Then type “GPT for spreadsheets and documents” in the search box and from the results that appear, select and install the following
This way the extension will already be associated with your Google account, but we still need to link the extension to your GPT-3 account or it won’t work.
To do this, click on Extensions again in the table, where you will now see that a new item has appeared called GPT for Tables and Documents. Move the mouse pointer over it and click Set API Key in the displayed menu, which will open a dialog in which you will have to enter a key generated specifically for this purpose.
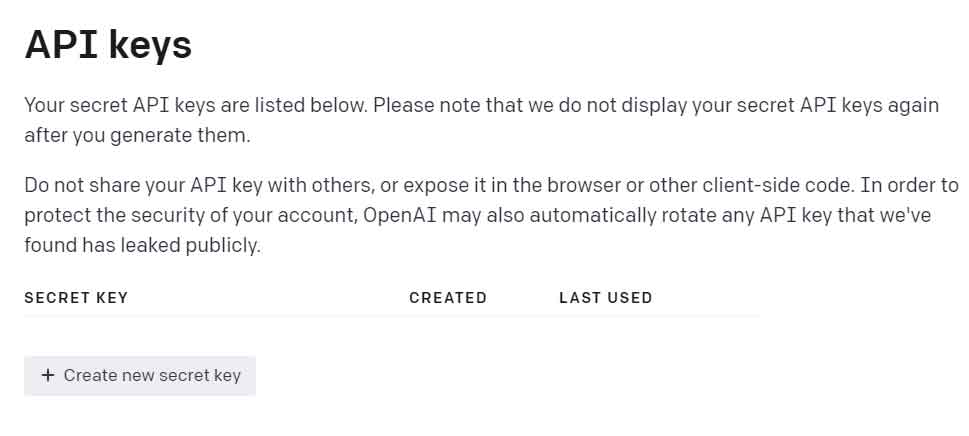
And where can such a key be found? Well, it’s actually quite simple, you can click on this link, which is the same as the one at the top of the box, which will take you to a page like this (you may need to log in with your account beforehand). OpenAI ):
Once there, click the Generate New Secret Key button and copy the newly generated key to your clipboard. It is very, very important that you do not share this key with anyone. Once you have it, go back to the table and put the key in the box called Enter OpenAI API Key. Once you’ve done so, click Check to verify that it was copied correctly, and when you receive a confirmation, you can confirm the operation by clicking Save API Key.
Now yes, the extension is already installed and you have access to your OpenAI account, so now you can use GPT-3 in your tables. Note, and this is important, that this operation will only need to be done once, not every time you create a workbook in which you want to use GPT-3.
generate a list
You must be looking forward to the event at this point, right? As you’ll see, once you’re connected, using GPT-3 features in Google Sheets is really simple.
First, click Extensions, scroll down to GPT for Sheets and Documents, and click Enable GPT Features to make sure the features are enabled.
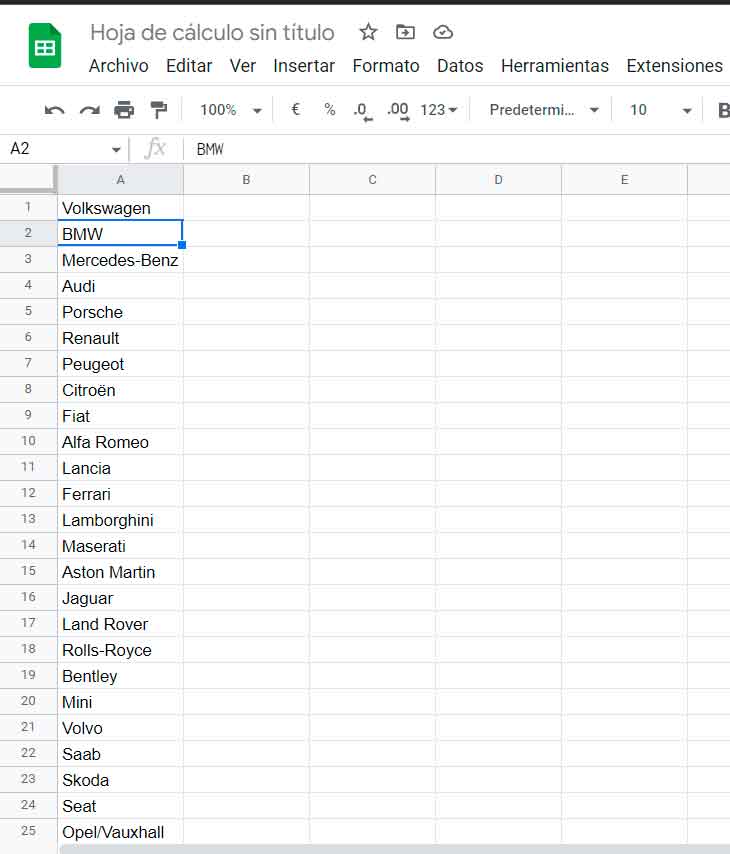
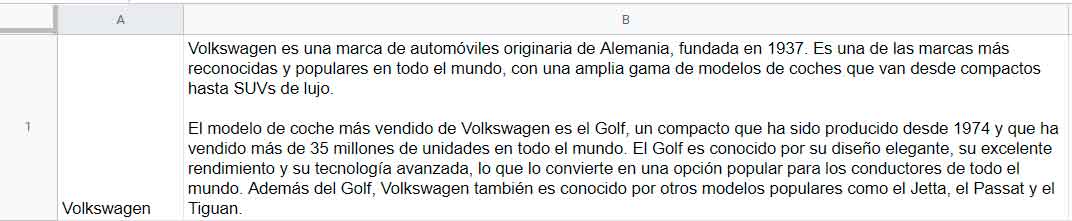
Now you need to enter the first query you want to pass to GPT-3, the one that will generate the list you want to create. To do this, go to cell A1 and type without quotes “=GPT_LIST(“Prompt for what you want to look for«). For example, if you want a list of the most popular European engine brands, your query might look like this:
=GPT_LIST(“Create a list of the top 25 European car brands”)
Press enter, wait a few seconds, and you’ll soon see the list that GPT-3 just created based on your query:
I’ve provided an example of car brands so you can check that the list may not completely adapt to your preferences (I told you at the beginning that you may need to review and edit them to make them more precise). So you can add and/or delete tags from the list if you wish. Of course, keep in mind that the list is generated based on a formula, so if you reload the document later, it may generate again. To avoid this, before editing the list, click Extensions, scroll down to GPT for Sheets and Documents, and click Replace GPT formulas with values in the entire worksheet. Then go to cell A1 and as you can see the formula you wrote in the beginning will no longer be there.
Generate descriptions
If all you wanted was a list, then you’ve got what you wanted. However, we talked about creating a glossary, so we’re still missing descriptions, right? Well, that’s what we’ll see next, because generating them is as simple as creating a list.
The first thing you need to do is write a query that will generate the descriptions. It’s important to be as specific as possible at this point, especially if you want them to include any specific dates. For example, suppose you want a brief description of each brand, including country of origin and best-selling car model. The query might go something like this:
«I want a short review about this brand including country of origin and best selling car model«.
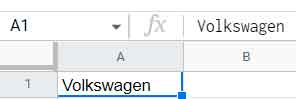
Of course, you can add more elements if you wish. When you’re done, write it in column A, a few lines below the last result in the list. For example, if it has 25 items and therefore ends in A25, enter the text without quotes in A30.
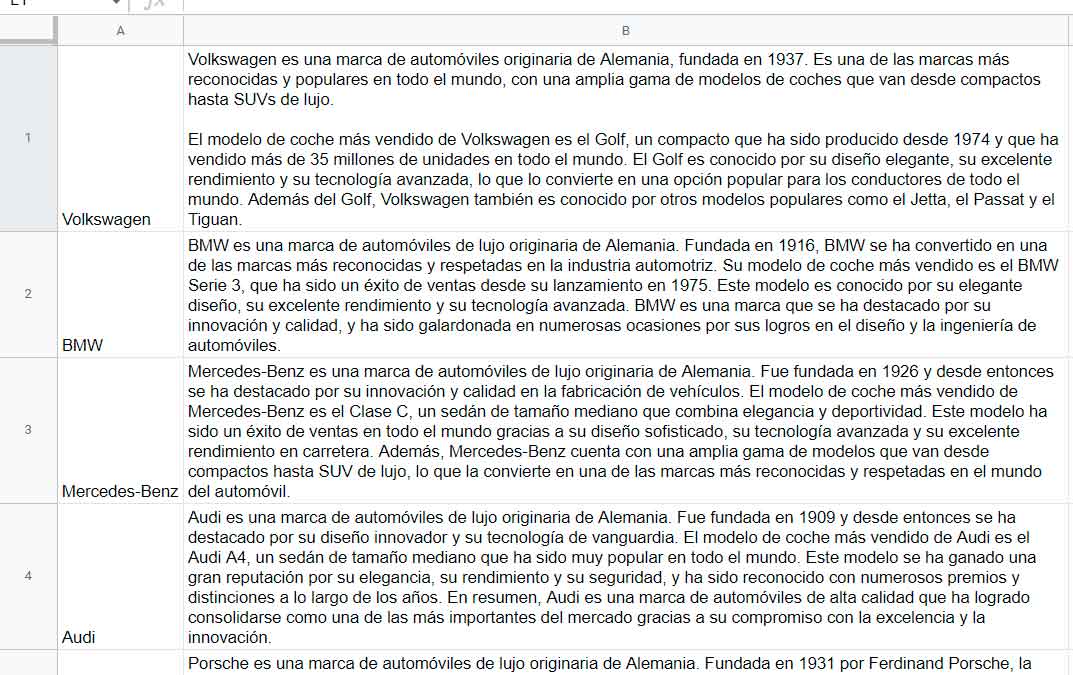
Ready? Now go to the right of the first item in the list, that is to cell A2, and type the following without the quotes:
“=GPT(A1;$A$30)”
Press enter and in a few seconds you will get the expected description, for example:
To generate the rest of the descriptions, select cell A2, place the mouse pointer in its lower right corner so that it changes shape to look like a +, then click and hold, drag down to select all the cells in column B that have, to the left of them one of the items in the list. In this example, you would drag to B25. After a few seconds, the remaining descriptions will begin to appear until the list is complete:
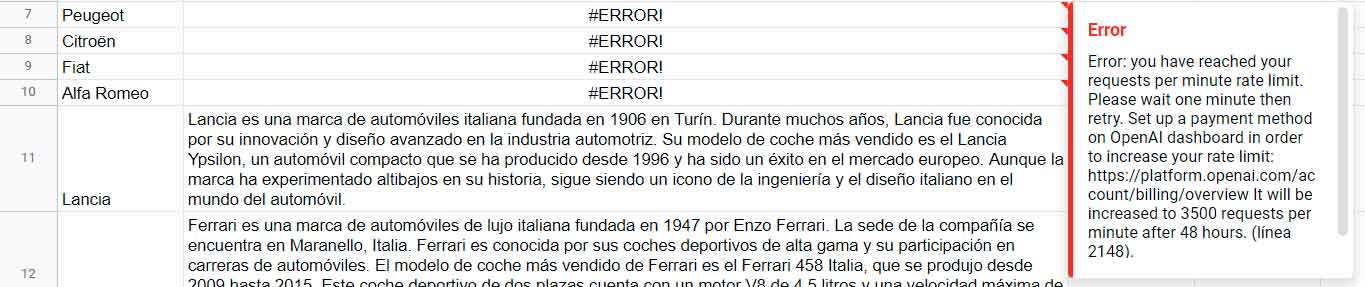
NOTE: Depending on the number of descriptions and the length of the descriptions, the text #ERROR! where some descriptions should be displayed. If you move the mouse pointer over any of these cells, a message will appear indicating the cause of the error, which is that you have exceeded the maximum number of queries per minute allowed for your account.
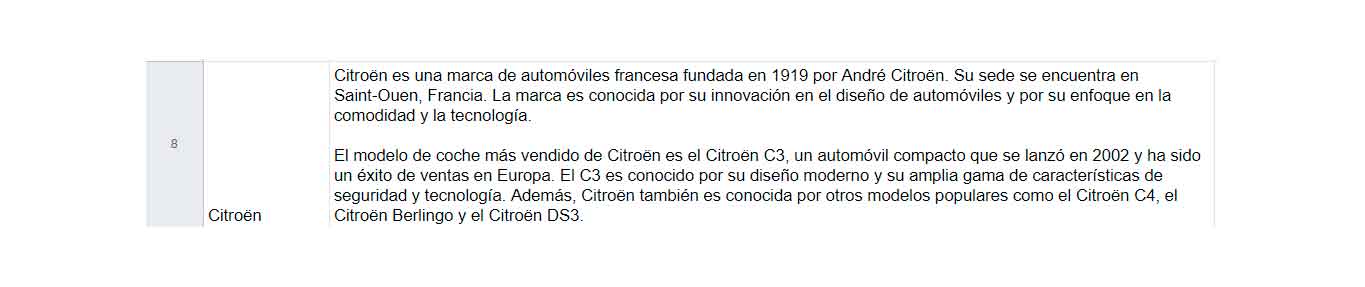
Don’t worry, in that case wait a while, go to one of the cells and copy its formula to the clipboard. Then delete the contents of the cell, re-enter the previously saved formula and the text will be generated correctly:
Repeat this process in the remaining cells where the error occurred and this way you will get the desired list. Remember, yes, click Extensions, go to GPT for Sheets & Docs, and click Replace GPT formulas with values throughout sheet to change the formulas for the values, and that way Google Sheets won’t ask. again for GPT-3 which generates texts.
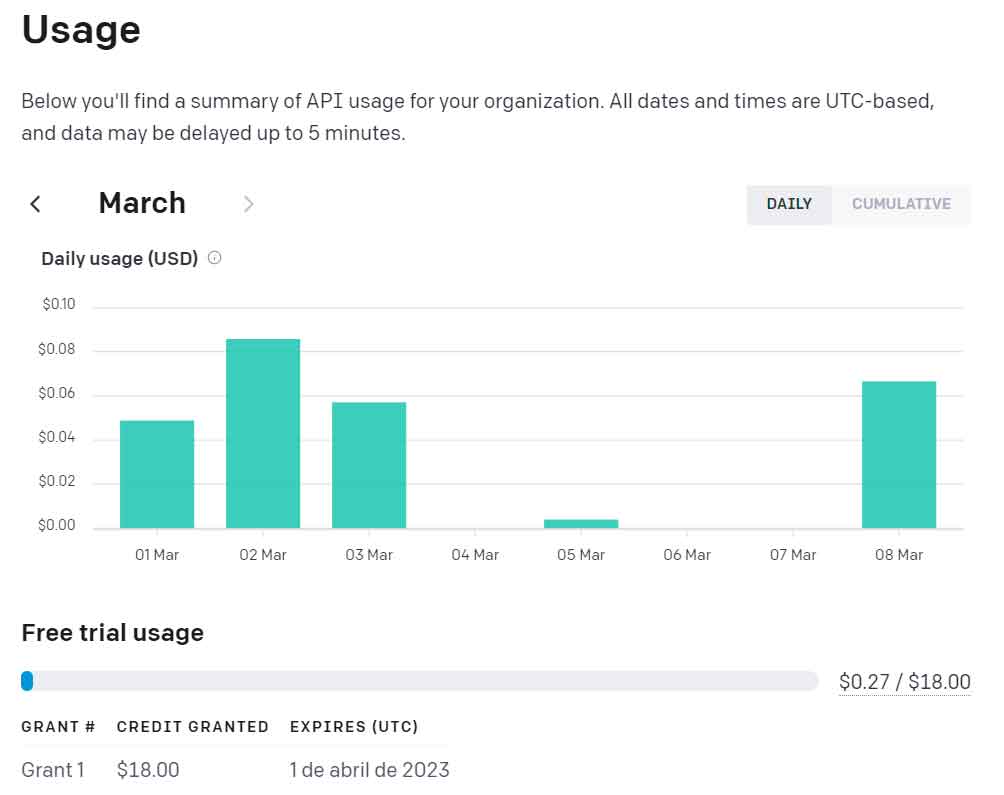
Check your OpenAI balance
As you may remember, at the beginning of this tutorial I told you that GPT-3 is not free, but that you have $18 credit so you can try it out. So you must be wondering what impact the glossary you created had on that, right? Well, you can check it very easily. Just click on this link and on the page that opens you will see a summary of your “finances”:
As you can see, in my case, with a list of 25 brands and their descriptions, I spent about seven cents, which means that with a balance of $18 you will be able to make quite a lot of glossaries.
Donald Salinas is an experienced automobile journalist and writer for Div Bracket. He brings his readers the latest news and developments from the world of automobiles, offering a unique and knowledgeable perspective on the latest trends and innovations in the automotive industry.