


How to record videos using Snipping Tool in Windows 11
- November 26, 2024
- 0
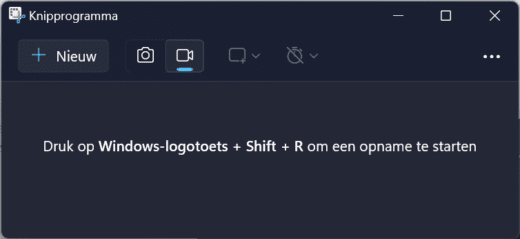
Screenshot of the snipping tool in Windows 11 The Snipping Tool is used to create screenshots in Windows 11 using the Windows key + Shift + S key


9621 Agnes Crossing, Lake Suzanneview, New Mexico Island 84604-9295.
Screenshot of the snipping tool in Windows 11 The Snipping Tool is used to create screenshots in Windows 11 using the Windows key + Shift + S key


The Snipping Tool is used to create screenshots in Windows 11 using the Windows key + Shift + S key combination. You can also use it to take pictures in Windows 11.
Windows 11 has a built-in screenshot tool called Snipping Tool. Recently, you can also use this tool to record videos. We’ll explain how it works.
If you don’t see a camera icon in the top bar after launching the tool, you may need to install the latest version from the Microsoft Store and uninstall the current one. You can do this via the advanced app settings in the Windows Control Panel.
Use the Windows Key + Shift + R keyboard shortcut to go directly to the recording function. Or you can search for in the Start menu cutting tool and open the application.

Drag your mouse to select the area you want: an entire window or a specific part of your screen
Click on Go-Button. The device then counts down from three to zero, after which recording begins. While recording, you have the option to pause, stop, or turn microphone and/or system sounds on or off. After you finish recording, save it via Save.
Source: IT Daily

As an experienced journalist and author, Mary has been reporting on the latest news and trends for over 5 years. With a passion for uncovering the stories behind the headlines, Mary has earned a reputation as a trusted voice in the world of journalism. Her writing style is insightful, engaging and thought-provoking, as she takes a deep dive into the most pressing issues of our time.


")


