


Hook hands: how to restore a burnt seat in a car for 200 rubles
- May 4, 2023
- 0
With whom it does not happen, as they say: an ember or even a whole “bull” fell, the chair smoked treacherously, tried to grab his pants, and after


9621 Agnes Crossing, Lake Suzanneview, New Mexico Island 84604-9295.
With whom it does not happen, as they say: an ember or even a whole “bull” fell, the chair smoked treacherously, tried to grab his pants, and after

So it happened: due to fatigue and addiction to a bad habit, an even hole with a diameter of a little less than a centimeter formed on the car seat, which always attracts attention and acts on nerves that have suffered in recent years. What if the car is for business? The penalty is not far away here.
The easiest way to solve the problem is a profile workshop, which for a “small fraction” and a few hours will return the chair to its previous appearance. Budget? From 3000 to 5000 rubles. And if you try, you can stay within 200 “wooden”, but then you will have to not just stand and watch, but work with your hands.
From the arsenal you will need scissors – 1 pc, PVA glue – 2 drops, an ordinary needle – 1 pc, a wallpaper roller or its substitute (at least a beer bottle) – 1 pc, a clean shoe brush – 1 pc. Finished? Then we go to the instructions.
The first step is to find a piece – literally half a matchbox – of fabric that is similar in color to the chair cover. You can cut off the remnants sticking out from below, you can look for suitable material at home – it doesn’t matter. We carefully scrape the molten dust from the edges of the burnt hole – dexterity is needed here, not speed. We grease the cut with glue – this is the first drop of PVA – and place it under the “scene”, passing the fabric through the hole. We aim, we press, we wait.
The second stage is the top layer. With scissors, we very carefully clean the pile from parts of the seats invisible to the eye – everything: even the back seat, if it is easy to recline – and collect the ball centimeter by centimeter. Then we apply the second drop of PVA – this is truly a great scientific achievement of mankind – and distribute it in the hole so that the glue does not go beyond the burnt surface. There and only there we put the pile obtained by the barbarian method and distribute it over the entire surface. After – roll out with a roller. Or what do we have in this role?
Last – combing the seat after drying. It is not worth using valiant skill and heroic power, but patience and accuracy are highly desirable. PVA glue dries for a long time, so our task is to distribute the pile over the entire “damage zone”. The more carefully we do this, the less “stupid reproaches” will be visible.
As practice shows, even the first experience can be successful if you do not hurry. And such a “patch” will last a long time. Unfortunately, much longer than a new similar problem appears.
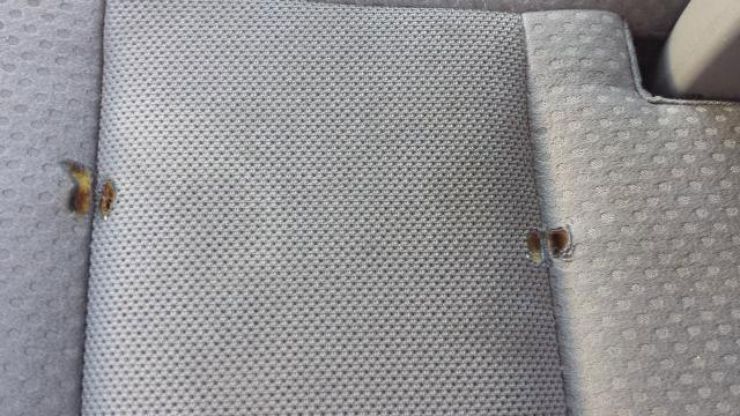
So it happened: due to fatigue and addiction to a bad habit, an even hole with a diameter of a little less than a centimeter formed on the car seat, which always attracts attention and acts on nerves that have suffered in recent years. What if the car is for business? The penalty is not far away here.
The easiest way to solve the problem is a profile workshop, which for a “small fraction” and a few hours will return the chair to its previous appearance. Budget? From 3000 to 5000 rubles. And if you try, you can stay within 200 “wooden”, but then you will have to not just stand and watch, but work with your hands.
From the arsenal you will need scissors – 1 pc, PVA glue – 2 drops, an ordinary needle – 1 pc, a wallpaper roller or its substitute (at least a beer bottle) – 1 pc, a clean shoe brush – 1 pc. Finished? Then we go to the instructions.
The first step is to find a piece – literally half a matchbox – of fabric that is similar in color to the chair cover. You can cut off the remnants sticking out from below, you can look for suitable material at home – it doesn’t matter. We carefully scrape the molten dust from the edges of the burnt hole – dexterity is needed here, not speed. We grease the cut with glue – this is the first drop of PVA – and place it under the “scene”, passing the fabric through the hole. We aim, we press, we wait.
The second stage is the top layer. With scissors, we very carefully clean the pile from parts of the seats invisible to the eye – everything: even the back seat, if it is easy to recline – and collect the ball centimeter by centimeter. Then we apply the second drop of PVA – this is truly a great scientific achievement of mankind – and distribute it in the hole so that the glue does not go beyond the burnt surface. There and only there we put the pile obtained by the barbarian method and distribute it over the entire surface. After – roll out with a roller. Or what do we have in this role?
Last – combing the seat after drying. It is not worth using valiant skill and heroic power, but patience and accuracy are highly desirable. PVA glue dries for a long time, so our task is to distribute the pile over the entire “damage zone”. The more carefully we do this, the less “stupid reproaches” will be visible.
As practice shows, even the first experience can be successful if you do not hurry. And such a “plaster” will last a long time. Unfortunately, much longer than a new similar problem appears.
Source: Avto Vzglyad
Donald Salinas is an experienced automobile journalist and writer for Div Bracket. He brings his readers the latest news and developments from the world of automobiles, offering a unique and knowledgeable perspective on the latest trends and innovations in the automotive industry.


